Caring for Trees
Last updated October 2024
If you want to try your hand at particular tasks, here is some advice on pruning, fertilizing, and planting trees. This information will also help you evaluate the work of professionals you hire.
Planting New Trees
The International Society of Arboriculture (ISA) recommends the following when planting new trees:
 The ideal time to plant most types of trees and shrubs is during the dormant season—in the fall after leaf drop or early spring before bud break. Weather conditions should be cool and allow plants to establish roots in the new location before spring rains and summer heat stimulate new top growth. However, trees properly cared for in a nursery or garden center, and given the appropriate care during transport, can be planted throughout the growing season. In either case, proper handling during planting is essential to ensure a healthy future for new trees and shrubs.
Before starting to dig a hole for your tree, locate all underground utilities. Call 811 to have authorities locate and mark all underground lines.
If the tree you are planting is balled and burlapped or bare-rooted, the tree’s root system has been reduced by 90 to 95 percent from its original size during transplanting. Reacting to the trauma caused by digging them up, trees commonly exhibit what is known as “transplant shock,” characterized by slow growth and reduced vigor following transplanting. Proper site preparation before and during planting, coupled with proper follow-up care, shortens the duration of transplant shock and allows the tree to more quickly establish itself. Follow these steps to significantly reduce the stress placed on the tree during planting:
- Lift the tree by the root ball, not by the trunk.
- Dig a shallow, broad planting hole. Make it wide—up to three times the diameter of the root ball—but no deeper than the ball. This helps the roots on the newly planted tree push through the newly loosened surrounding soil to establish themselves.
- Identify the trunk flare, which is where the roots spread at the base of the tree. It should be partially visible after the tree has been planted, and if it isn’t you may have to remove some soil from the top of the root ball.
- Before placing the tree in the hole, check to see that you’ve dug the hole to the right depth. Most of the roots of newly planted trees develop in the top 12 inches of soil. Plant it too deep, and a lack of air hinders new root growth. To allow for some settling, plant the tree a little high—one to two inches above the trunk flare—not at or below the desired growing level.
- Straighten the tree in the hole before backfilling. Eyeball it from several directions to make sure it’s straight, since it’s harder to reposition once the soil is in place.
- Fill the hole until it is one-third full, gently but firmly packing the soil around the base of the root ball. Then, if the tree is balled and burlapped, cut and remove materials from around the trunk and top one-third of the root ball, being careful not to damage the trunk or roots. Fill the rest of the hole, adding soil a few inches at a time, packing firmly and settling with water to avoid creating air bubbles that can dry out roots. Continue until the hole is filled and the tree firmly planted. Applying fertilizer at the time of planting is not recommended.
- Stake the tree only if necessary. Studies have shown that trees establish themselves more quickly and develop stronger trunk and root systems if they are not staked during planting. However, protective staking is a good idea if your green addition might suffer from lawnmower damage, vandalism, or windy conditions. If staking is necessary for support, two stakes used in conjunction with a wide, flexible tie material will hold the tree upright, provide flexibility, and minimize injury to the trunk. Remove support staking and ties after the first year of growth. Leave protective staking in place as long as necessary.
- Mulch the base of the tree. It acts as a protective blanket, holding moisture in, protecting against harsh soil temperatures, and reducing the growth of grass and weeds. Some good choices are leaf litter, pine straw, shredded bark, peat moss, and wood chips; a two- to four-inch layer is ideal. When applying mulch, don’t cover any part of the trunk; leave a mulch-free area one to two inches wide at the base of the tree to prevent moist bark and decay.
- Moisten but don’t soak soil; overwatering causes leaves to turn yellow or fall off. Water newly planted trees at least once a week (barring rain) and more frequently during warm weather. When the soil is dry below the surface of the mulch, it is time to water. Continue until mid-fall, tapering off as temperatures drop.
Other follow-up care may include minor pruning of branches damaged during planting. Prune sparingly just after planting, and don’t begin necessary corrective pruning until the tree has had a full season of growth in the new location.
You can find the above advice, as well as other information on tree care, on the ISA website.
Pruning
 No matter who does it—you or a professional—pruning is important to a tree’s health. Targets include:
- Dead, dying, and unsightly parts of trees.
- Sprouts growing at or near the base of a tree trunk.
- Branches that grow toward the center of a tree.
- Crossed branches that rub together.
- Branches that interfere with utility lines, or that might rub against or fall on your house (if power lines are the problem, leave it to a professional).
- Branches that obstruct your view or desired breezes.
Though most trees can be pruned at any time, it’s best to do it during the dormant season and very early in the spring before leaves form. Pruning directly above a branch or bud growing toward the outside of a tree tends to broaden the tree’s crown.
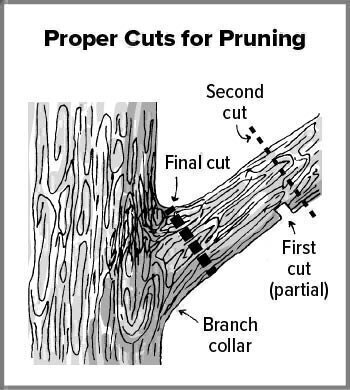
To prevent stripping off bark, stub-cut all branches that are too large to be supported by hand. Stub-cutting requires three saw cuts. First, cut upward about halfway through the limb and a foot out from the point of the final cut. Make the second cut a few inches farther out on the limb, cutting down from the top until the limb is severed. Finally, saw off the stub.
In sawing off the stub, follow the figure below. Note that the final cut should be made at an angle of roughly 30 degrees and away from the main trunk.
 Do not paint wounds at spots where you’ve removed branches; prevailing scientific opinions say that this doesn’t stop decay or rot, and may interfere with a tree’s natural healing process.
Also, keep in mind that pruning coniferous trees—those with cones and needles—such as pines, spruces, firs, and yews is different from pruning other trees and shrubs since they don’t replace growth. If you prune them for shape or size, you’ll have to live with the results.
Fertilizing
Though most trees never need to be fertilized, urban trees are more likely than suburban or rural ones to be planted in soil that lacks sufficient nutrients for satisfactory growth and development.
Because giving them extra nitrogen—a main component of most fertilizers—can actually worsen diseases and pest infestations, certain trees should never be fertilized. Fertilizer-induced difficulties include increased severity of fire blight on crabapple trees, higher populations of aphids on tulip poplars, woolly adelgids (similar to aphids) on hemlocks, and obscure scale (armored insects) on red oaks.
If you decide that fertilizing is right for your tree, follow these guidelines: After transplanting a tree, wait a year before applying fertilizer. Mature trees will not benefit from fertilizing more often than once every two or three years. Fertilizing the lawn or gardens around a tree also helps the tree. The best time to fertilize is autumn, when the weather is cool and soil moisture plentiful.
To apply fertilizer, use a crowbar to pound holes 12 inches deep and 18 to 24 inches apart at the tree’s drip line (the line around the perimeter at the outer tips of the branches). Fill the holes with fertilizer to within a few inches of the top, and fill the remainder with sand. Avoid burying the fertilizer too deep in the soil because roots are seldom more than a foot deep.
Determine how much fertilizer to use by measuring the trunk; experts recommend one cup of fertilizer per inch of diameter.


