Last updated February 2021
Yellow is a happy color: warm sunshine; pretty daffodils; fresh lemons; rubber duckies. But while yellow might make us smile, we don’t want it in our smiles. Tobacco and coffee, cola, red wine, tomato sauce, and many other foods and beverages can stain your tooth enamel yellow, brown, or gray—no matter how often you brush or visit a dentist for professional cleanings. Since your tooth enamel thins as you age, even if you avoid consuming staining substances discoloration can eventually occur.
Thankfully, there are several options to lighten your not-so-pearly whites. Some methods are completely DIY, some are DIY with help from a dentist, and some are performed while in a dentist’s chair.
Be aware that most dental restoration work—caps, crowns, and fillings and veneers made with resin composites—won’t be affected by any of these methods; only your natural teeth can be bleached. If you have visible dental work, the only way to get uniformly white choppers may be to also redo the restoration work or get whiter veneers applied.
Here’s a rundown of the three major types of whitening approaches.
 In-Office Dental Treatments
All whitening methods require a bleaching agent, usually hydrogen peroxide or carbamide peroxide (which releases hydrogen peroxide). The main differences in treatments and products are costs and time. Because dentists can apply agents with high concentrations of hydrogen peroxide, while protecting gums from damage, they can offer same-day efficacy.
A clinical study cited by the American Dental Association (ADA) found that, to achieve the level of whitening received during a single in-office procedure, a dentist-prescribed at-home treatment program took seven days and an OTC bleaching product took 16 days. The tradeoff? In-office treatment costs more than at-home options.
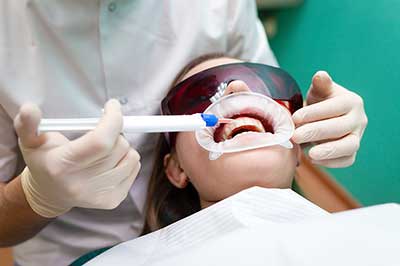
During an in-office whitening or “power bleaching” session, the dentist will clean teeth to remove plaque and tartar, and then shield gums and apply a highly concentrated whitening liquid and cure it (speeding its action) with ultraviolet light for up to 15 minutes, then repeat the process three to four times in the same visit. Because the whitening agent used is strong, this method is seldom recommended for anyone with sensitive teeth.
Another method some dentists use involves applying a whitening agent onto the teeth and sealing it into place with a varnish; after 30 minutes, the applications are brushed off.
In-office treatments typically cost from $500 to more than $1,000, depending on the dental practice and procedure used.
If you already have a tooth doc you like, you’ll probably want to stick with him or her for whitening work. Keep in mind that our ratings of dental practices reveal huge price differences for the same care, with some practices charging more than twice what others do for the same procedures. We also find that low-priced dentists aren’t more likely to deliver lousy care; in other words, many top-rated dentists offer low prices.
 Take-Home Kits from Your Dentist
As an alternative to in-office whitening, many dentists supply patients with whitening gels and trays, and send them home to treat their own teeth.
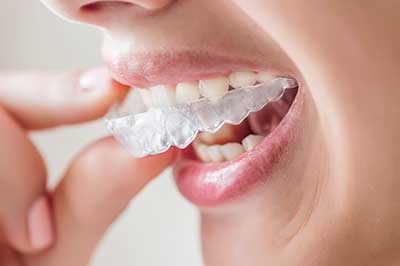
With most of these at-home regimens, the dentist will make a mold of your teeth or use a 3-D scanning tool to create a digital model. Either can be used to fabricate a custom tray (or trays, if you’re whitening top and bottom). At home, you fill the trays with a small amount of whitening gel and wear them periodically for a few days or weeks, depending on the strength of the whitening agent and desired hue. The trays help maximize tooth coverage and minimize the amount of whitening agent that touches your gums, which helps avoid irritation. The precise fit of custom trays also keeps saliva from mixing with and weakening the whitening agent.
At-home treatments usually use solutions with carbamide peroxide concentrations ranging from 10 to 38 percent, with higher concentration levels enabling shorter treatment periods. The ADA reports that daily treatment times for whitening typically range from two to 10 hours for periods of six to 28 days.
Your dentist should prescribe a gel with a lower concentration if you’re likely to experience pain from tooth sensitivity or gum irritation. Dr. Sara Cohen, a dentist practicing in D.C., told us that after years of prescribing at-home whitening treatments, she prefers a lower 10 percent-concentration gel worn for longer periods of time over high-concentration ones used for fewer days. She also recommends patients wear trays overnight. While the product remains active for only a few hours, she said there’s no harm in wearing the trays beyond that timeframe while you sleep.
To conserve product and reduce pain from teeth sensitivity, you can opt to apply gel only to the front of the trays.
Once your teeth have reached your desired shade, you can discontinue treatment. But hang on to the trays and any leftover gel for future touchups.
Most dentists charge from $400 to $600 for take-home whitening using custom trays.
 Over-the-Counter DIY Products
Strips, gels, pens, pricy toothpastes, kits with fancy lights, celebrity endorsements…the at-home tooth-whitening marketplace offers overwhelming options. But once we peel away the marketing hype, all this stuff is similar: Like the products dentists can apply or prescribe, almost all effective over-the-counter products contain hydrogen peroxide or carbamide peroxide. The differences? Concentration levels and application methods.
The bestseller among OTC options is Crest 3D Whitestrips, introduced in 2001. This—and competing brands of strips that you stick to your fangs for 20 to 60 minutes—offers a mess-free alternative to also-popular gels that you spread over your grill. The ADA suggests using strips that contain no more than 10 percent of hydrogen peroxide or 35 percent of carbamide peroxide.
The big difference between using whitening strips vs. custom trays provided by dentists is that the trays hug each tooth, allowing the whitening agent to reach its entire surface, whereas strips offer only a one-size-fits-all design that may not contact all the surfaces you wish to whiten, especially in spots between teeth.
But many dentists, including Dr. Cohen, say they can work and are worth a shot. Their low cost, compared to treatment from a dentist, is especially attractive: Kits that include a two-week course of treatment usually run only $25 to $60, depending on brand and features.
Also consider various gels, pens, and other at-home methods. Many consumers like those that have a flexible-tipped applicator to spread whitening gel directly onto teeth, letting them reach spots strips won’t contact, such as those little gaps between teeth. Crest competitor Colgate offers such a whitening pen that promises to whiten teeth in just a week using a three percent hydrogen peroxide gel that you wear overnight, no trays needed; the bleaching varnish dries immediately. Since it uses such a low concentration of peroxide, it might be a good option for those with sensitive teeth.
Take care when using any of these at-home products, as the peroxide can cause temporary gum irritation, especially if the treatment procedure allows the solution to contact gums.
How Long Will the White Last?
Unfortunately, your newly pearly whites will not stay so pearly forever. Most smiles will remain bright for one to three years, but you likely will see a partial loss of whiteness within a few months—especially if you continue consuming the same foods and drinks or using tobacco products that caused the initial discoloration.
You can re-treat—either with the help of a dentist or on your own. If you opt for a dentist-fitted tray-based system, make sure you hang on to the trays; that way, you can simply get more gel from your dentist. The nice thing about follow-up self-treatment is that you can do a “touchup” on occasion—possibly by wearing a tray or strips for a couple of hours at some convenient time every few months.


